

I don't know why, but I have been keeping the plastic lids that are on the milk bottles that come with my children's kid's meals at fast food restaurants. I had no project in mind, they just seemed like they might come in handy for something.
Well, after collecting four more caps this weekend, I decided to do a little Pinterest searching to see what the rest of the world is doing with their plastic caps.
I found several ideas that I pinned, including these two that holds lots of promise - this one and this one. But the one I decided to start with is this tiny pincushion. I fully intended to make it just like the ones in her pictures, but I didn't like any of the ribbon that I have (and it is after 9pm on a Sunday, so I am not headed out to buy more). I found some fabric that would match the brown lid that came off my daughter's chocolate milk at some point and pulled together the rest of the very few supplies I needed for this project.

Supplies needed:
-Plastic lid (mine is from a chocolate milk bottle from a fast food kid's meal)
-Small circle of fabric
-Batting (not as much as in the photo)
-Needle
-Thread
-Glue
-Scissors
Optional and not shown in this tutorial:
-coordinating ribbon to glue onto the outside of the plastic cap
-felt to go on the bottom (I couldn't find any in the chaos of my "craft room")
Step 1 - Cut the fabric.

Cut the fabric circle larger than the bottle cap. You can see the proportions I used in the photo. The bigger the fabric circle, the more cushion that will stick up from the cap. Adjust yours accordingly.
Step 2 - Sew the fabric circle into a cushion.

Using the needle and thread, sew a simple running stitch just in from the edge of the fabric.
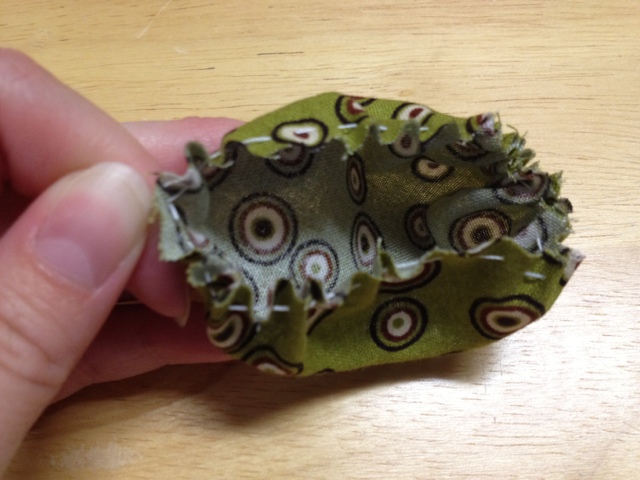
When you get back to the beginning, pull it together a bit to form a little pouch you can start to stuff.
Step 3 - Stuff

Put a pinch of stuffing into the fabric pouch. Keep adding more while pulling the thread tails tighter from both ends.

Once you have it stuffed tight, pull both thread ends as tight as you can and tie them together in a knot.
Before moving on to the next step stuff your little cushion into your lid to make sure you like how it looks. If there are problems, now is the time to adjust. If it is good, move on to Step 4.
Step 4 - Glue

Get your glue and put a nice coating on the inside of the lid. Make sure you get some on the sides and bottom.
Step 5 - Cram and finish

Now, take the little fabric cushion and cram it open-end-first into the gluey lid. Tuck it in nice and even. And that's it!
Optional steps (that I did not take, but might next time)
-The blog I found this on, put ribbon around the edge of the cap to cover the plastic. I was planning to do this, but didn't like my ribbon choices.
-You could also cut a circle of felt the same size as the cap and glue that on the bottom. I was going to do this too, but couldn't find anything other than pink felt in the chaos of my "craft room". I could always add that later. Or next time.
Now, put a bunch of pins or needles in it. Enjoy!

No comments:
Post a Comment